

Learn To Photograph Your Own Family - A BegiNners Series
Part 1: Light (This Is Where It All Starts)
Before we dive in, one quick thing.
This little series is not just for people with fancy cameras.
Everything I’m sharing here works just as well with your phone.
In fact, most of these tips have nothing to do with camera settings at all.
They’re about light, composition, and noticing small moments - and your phone is more than capable of capturing those beautifully.
So if all you have is your phone in your pocket, you’re already good to go.
If you're anything like me, once you had kids, something shifted.
Suddenly the days felt fast. The details felt fragile. The way their hands wrapped around your finger. The messy hair in the morning. The crumbs on the kitchen bench.
I didn't start photography because I loved cameras. I started because I didn't want to forget.
What began as "I'll just take a few photos" slowly became a quiet obsession with capturing the little in-between moments. The way light fell across a cheek. The way my kids leaned into me without thinking.
And that's why I'm writing this. Not to turn you into a professional photographer. But to help you see differently.
Because once you understand light, your photos instantly change. And it's simpler than you think.
I'll be honest with you — when I first started, I fell down every YouTube rabbit hole imaginable. Histograms. Exposure triangles. White balance. My ADHD brain glazed over approximately four minutes in and I'd end up watching something completely unrelated about van conversions.
So I'm not going to do that to you.
This is the version I wish someone had handed me at the beginning. No jargon. No overwhelm. Just the stuff that actually makes a difference when you're trying to capture your kid mid-chaos before the moment disappears.
Let's start with light — because honestly, it's everything. Get the light right and even a phone photo looks stunning. Get it wrong and even the most expensive camera in the world can't save you.

First — Start Noticing Your Home
Before we talk about golden hour or window light or any of the good stuff, I want you to do something simple: just start observing.
Walk around your house at different times of day and notice where the light falls. Morning light is different to afternoon light. Winter light is different to summer light. The corner of your kitchen at 7am might be absolute magic. Your living room at 3pm might be a blown-out disaster.
You don't need to go anywhere special to take beautiful photos. You just need to know your home.
Spend a week just noticing. Where does the light come in? Where does it create shadows? Where does it feel soft and warm? That awareness alone will change the way you shoot.
Try this: Put your phone down for one morning and just watch the light move through your house. Note the spots that look beautiful — the patch on the hallway floor, the light through the kitchen window at breakfast. Those are your magic spots.
Golden Hour — Why Everyone Talks About It (And They're Right)
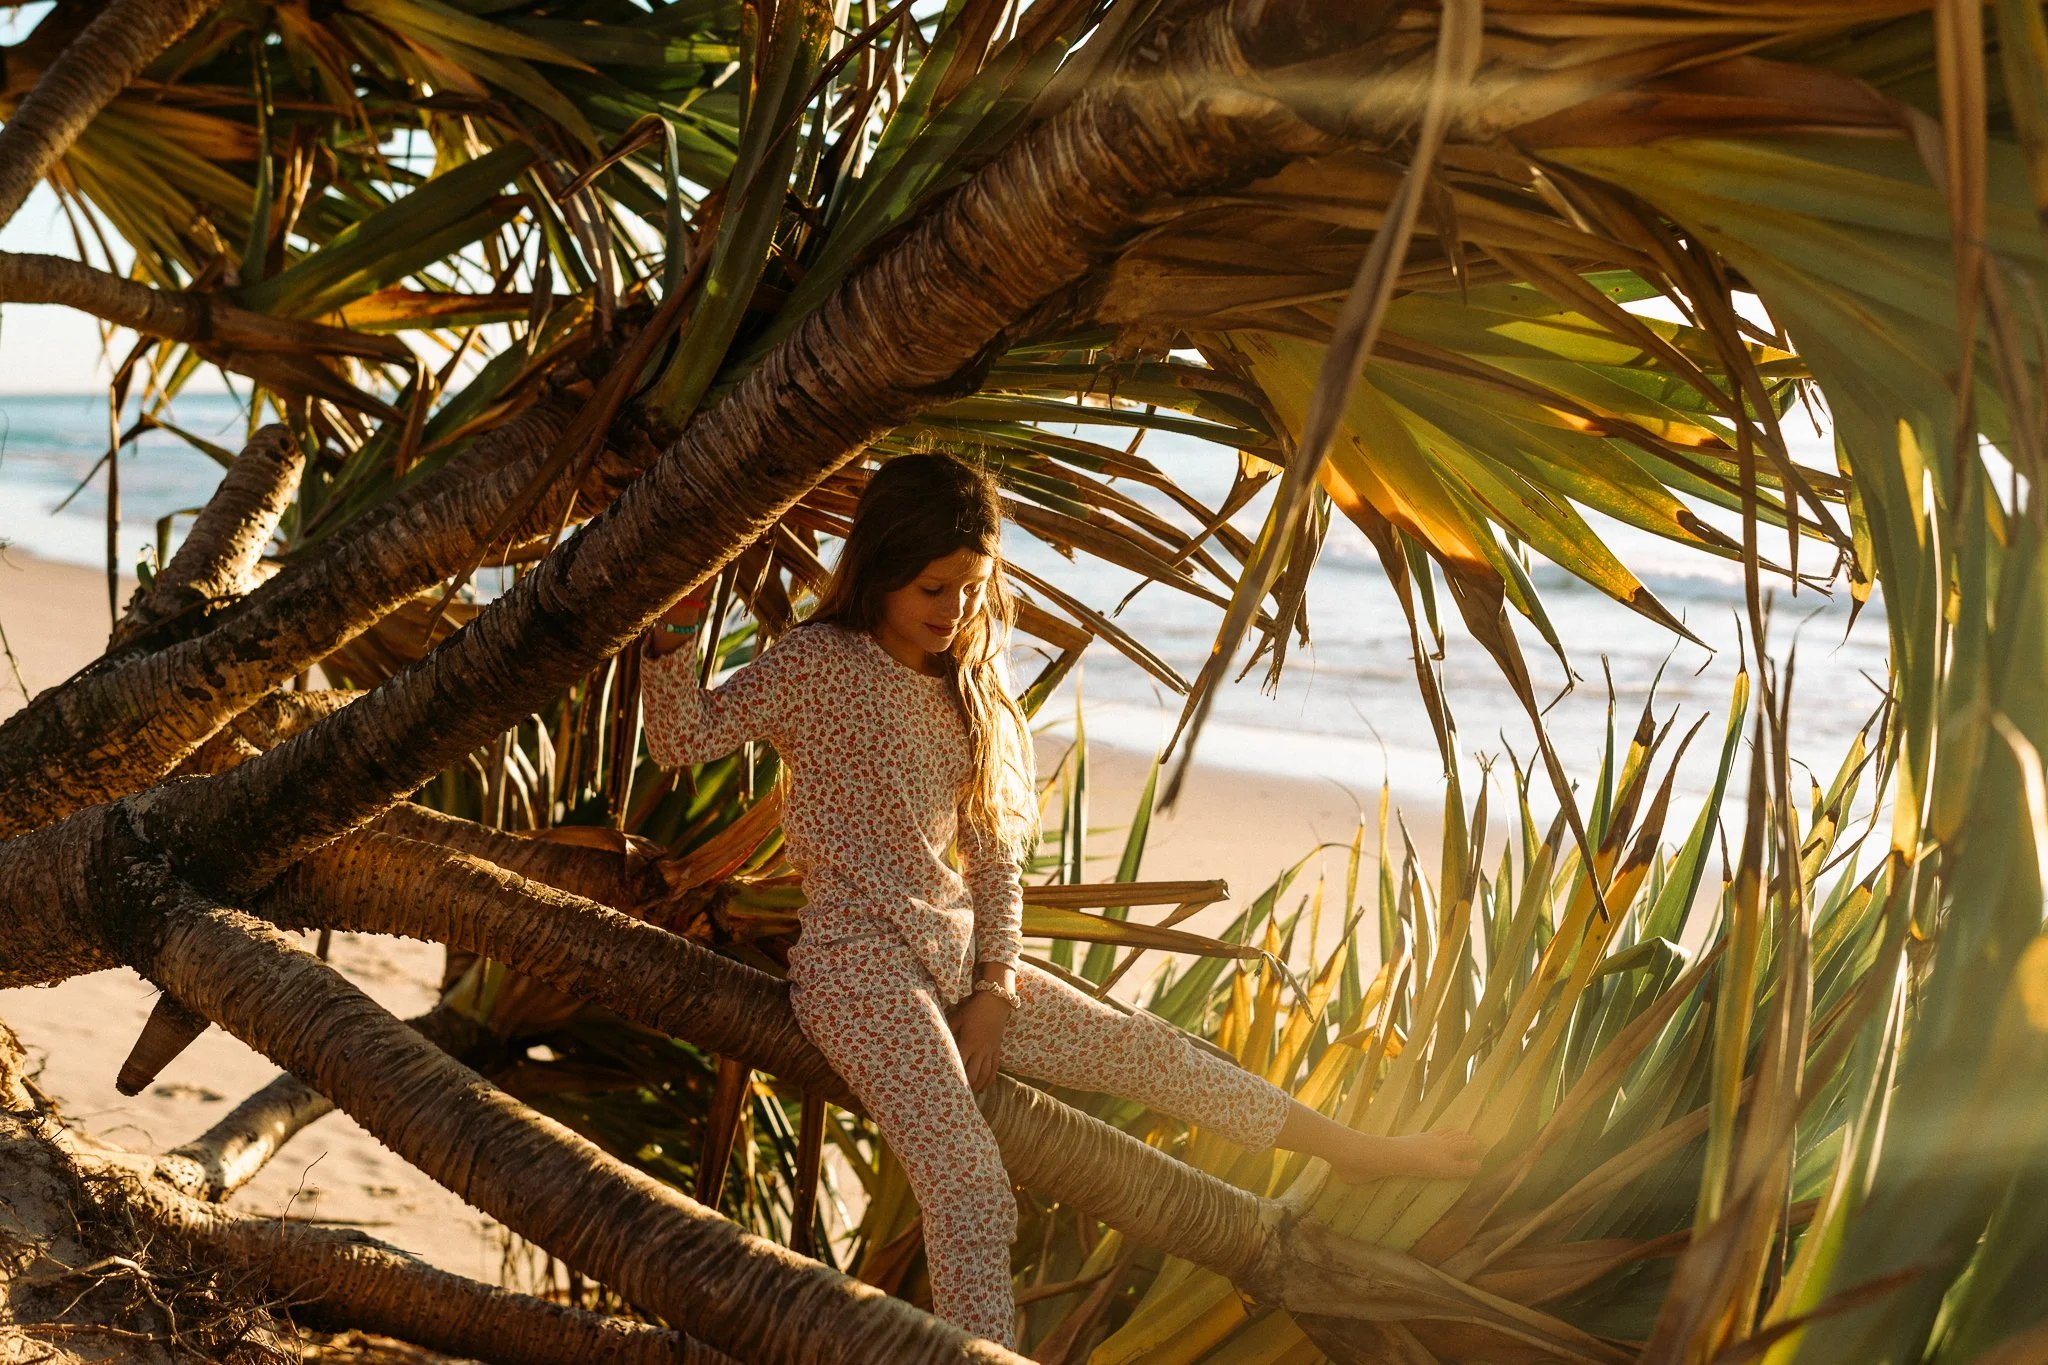
Golden hour is the hour after sunrise and the hour before sunset. The light is low, warm, and soft — and it makes literally everything look better. Skin glows. Shadows are long and gentle. Even the most chaotic kid looks like they've stepped out of a film.
On the Gold Coast we are genuinely spoiled for golden hour. That warm Queensland late afternoon light hitting the beach, the hinterland, even your backyard — it's the stuff professional photographers plan entire sessions around.
This is the single easiest thing you can do to instantly improve your photos: go outside in the hour before sunset and just shoot.
You don't need to do anything fancy. Just be outside, let the light hit their faces, and press the button.
Practical tip: The light changes fast during golden hour — you've got maybe 20-30 minutes of the really good stuff. Don't spend it fussing over poses. Just let them run, play, exist. The light will do the work.
Early morning light works the same way — soft, directional, beautiful — but let's be real. If you have small kids, you're probably already awake. Might as well use it.
Window Light Indoors — Your Best Friend on a Regular Day
Most of the moments you want to capture happen indoors. Breakfast. Bath time. The quiet reading moment on the couch. And most of those moments happen nowhere near golden hour.
This is where window light becomes your everything.
Natural light coming through a window is soft, directional, and flattering. It wraps around a face beautifully. It creates depth without harshness. And you have it for free, every single day.
The trick is position.
Instead of standing your subject facing the window head-on (which can wash everything out), try placing them side-on to the light source. Turn their body so the light is coming from one side. Watch what happens to their face — the light catches one cheek, creates a gentle shadow on the other, and suddenly it looks like you actually know what you're doing.
Try this: Next time your kid is eating breakfast near a window, instead of shooting from across the table, move around to their side. Position yourself so the window light is hitting them from the side rather than behind or straight on. You'll immediately notice the difference.
The further they are from the window, the dimmer and moodier the light. The closer they are, the brighter and more defined. Play with that distance and see what feels right.

Harsh Midday Light — What to Avoid (And What to Do Instead)
Midday sun is the enemy of beautiful photos. It's high, it's direct, and it creates harsh shadows under eyes, noses, and chins that make everyone look exhausted and slightly hostile. Even the most photogenic kid looks rough in midday summer sun.
So what do you do when it's the middle of the day and the moment is happening right now?
Get into the shade. Open shade — under a tree, on a covered verandah, the shaded side of a building — gives you soft, even light with no harsh shadows. It's not as warm and dreamy as golden hour, but it's clean and flattering and it works.
Indoors is also your friend. Pull the curtains slightly, use window light, and shoot inside rather than fighting the harsh outdoor light.
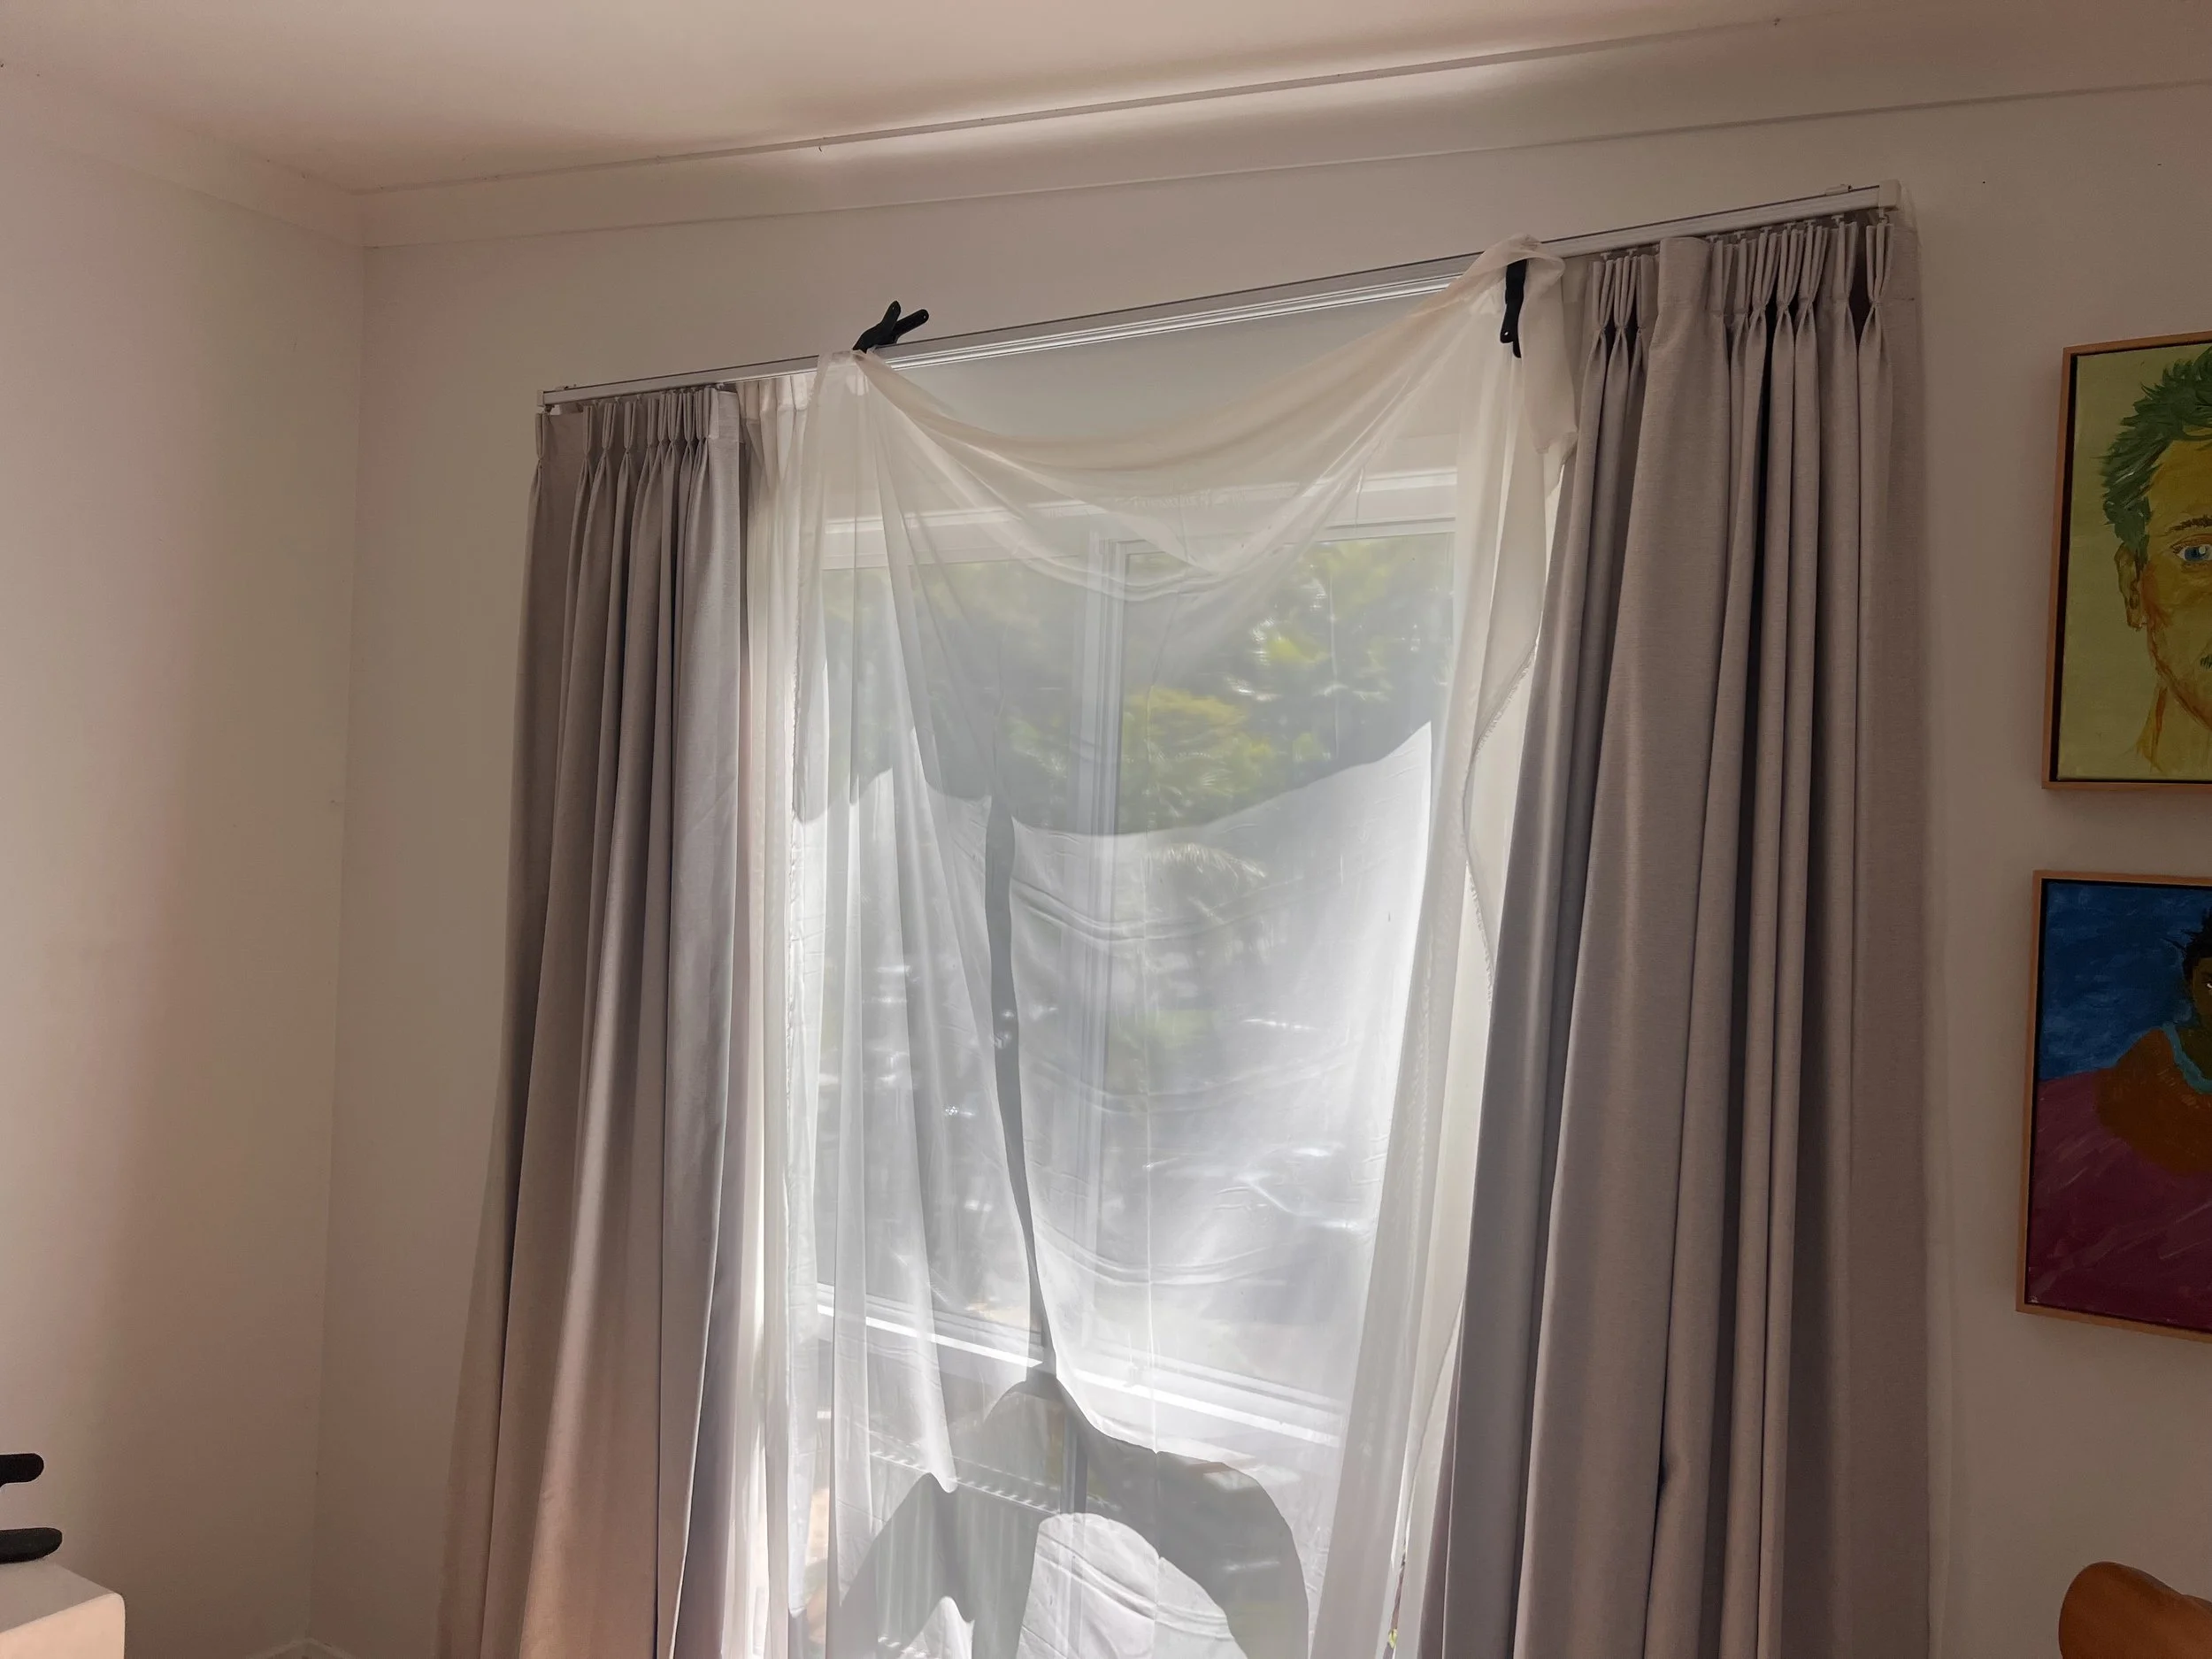
And if you're indoors but the window light is still too harsh — too bright, too contrasty, creating shadows you don't want — I have a trick I use all the time: I clamp a piece of thin sheer fabric directly over the window. It takes about thirty seconds and it completely transforms the light. The fabric diffuses it, softens it, spreads it evenly across the room without blocking it out. Suddenly that harsh midday window becomes something warm and gentle and actually usable. You can grab sheer fabric from any fabric shop for almost nothing, or honestly, a white sheet works in a pinch.
The rule: Direct sun on a face = harsh and unflattering. Shade or indirect light = soft and beautiful. When in doubt, move to the shade — or clamp a sheer over the window and bring the good light to you.

Overcast Days — Actually Kind of Magic
I know. You've planned a shoot, you've wrangled the kids, and you wake up to grey sky and feel immediately defeated.
Don't be.
Overcast light is actually one of the best conditions you can shoot in, and here's why: clouds act as a giant natural diffuser. They soften and spread the light evenly across everything, which means no harsh shadows, no squinting, no blown-out highlights. It's like shooting in a giant softbox.
The colours in your photos will be more muted and true-to-life. Skin tones look even and natural. And your kids can actually open their eyes without looking like they're staring into the sun.
Overcast days are genuinely underrated. Lean into them.
The only thing to watch on overcast days: the light is flat, which means less depth and dimension. Combat this by still being mindful of your light source — position your subject near a window or in open shade to keep some direction in the light even when it's diffused.

Pockets of Light — The Hidden Ones Worth Hunting
Once you start noticing light, you'll start seeing it everywhere. Pockets of light are those unexpected, fleeting moments where light does something beautiful — and they happen all the time if you're paying attention.
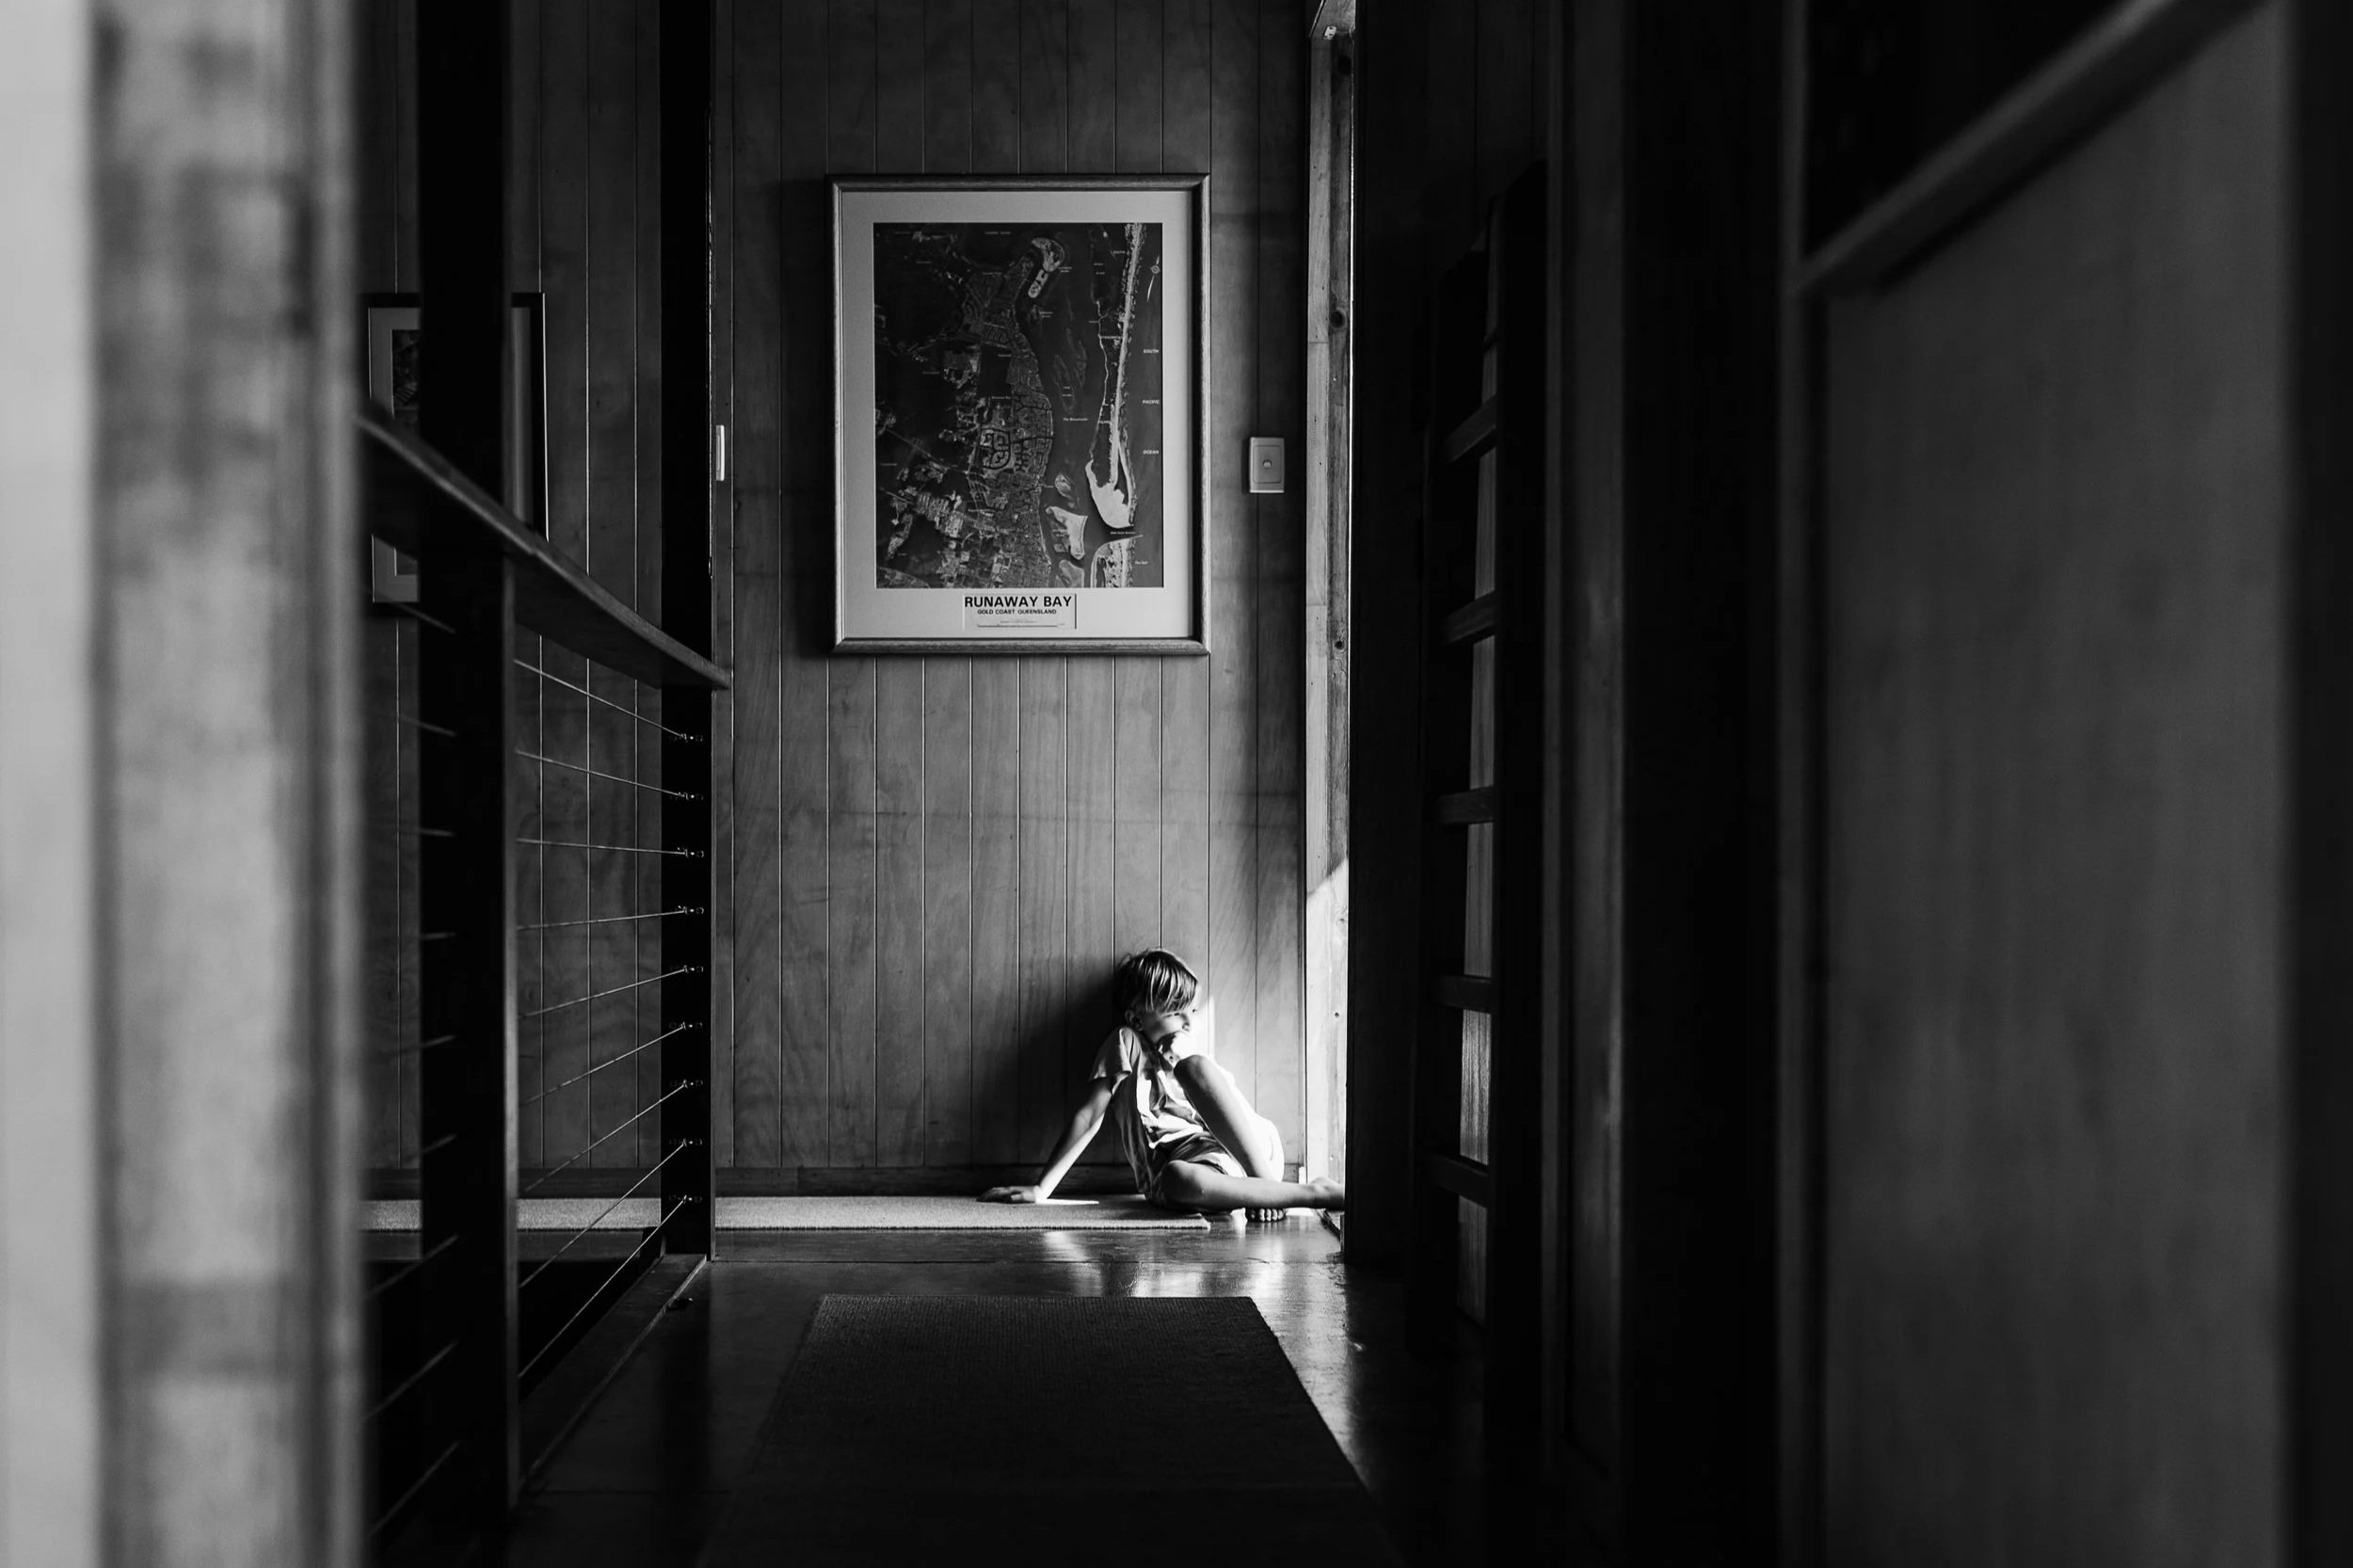
The stripe of sunlight coming through the blinds that falls across your kid's face while they're watching TV. The beam of light through a doorway. The dappled light filtering through leaves. The glow of a bedside lamp in an otherwise dark room at story time.
These are the moments that look like art. And you don't create them — you just have to notice them and be ready.
This is the part of photography that I genuinely love most. You're not setting anything up. You're not posing anyone. You're just moving through your day with your eyes open, and when the light does something magic, you pick up the camera.
Start a habit: when you notice a beautiful pocket of light in your home, stop for thirty seconds and look at it properly. Where is it coming from? How long will it last? Is there a moment happening nearby that could move into it? Train your eye and eventually it becomes automatic.
One Practical Trick That Changes Everything — Sheer Curtains
If you're shooting indoors and the light through your window is too harsh — too bright, too contrasty, creating ugly shadows — hang a sheer white fabric or a sheer curtain over the window.
It diffuses the light without blocking it. It softens everything. It turns a harsh midday window into something that feels warm and gentle and intentional.
You can buy sheer white fabric from any fabric shop for almost nothing, or use a white sheet in a pinch. Drape it over the curtain rod or tape it lightly over the window. It takes thirty seconds and the difference is immediately noticeable.
This is one of those professional tricks that sounds too simple to actually work — until you try it and immediately understand why photographers use it everywhere.
The Short Version — What to Actually Remember
I know that's a lot. So here's the cheat sheet:
· Golden hour (one hour before sunset) = the easiest, most beautiful light you'll ever shoot in. Go outside and use it.
· Window light indoors = your everyday best friend. Position your subject side-on to the window, not facing it.
· Harsh midday sun = move to shade or go indoors. Every time.
· Overcast days = actually great. Even, soft, flattering. Don't cancel the shoot.
· Pockets of light = train your eye to notice them. They're everywhere once you start looking.
· Sheer fabric over a harsh window = instant soft, beautiful indoor light.
· Walk your home at different times of day = know your magic spots before you need them.
That's it. That's the whole section on light.
You don't need to memorise everything at once. Just pick one thing — maybe it's going outside at golden hour this week, or moving your kid to the window next time you want to grab a photo — and try it. Notice what changes.
Because once you start seeing light, you can't unsee it. And your photos will never look the same.
Keep your eyes out for Part 2: Natural Expressions - How to Capture Real Moments (Without Forcing Smiles)